Assignment 3 - Name Using 3x3 LED Array
Problem Statement
In groups of two, write your first name by switching 9 LEDs on/off and push buttons such that:
-
With the press of one push button, the letters of the name blink every 1000 ms
-
With the press of another push button, all LEDs blink ON and then OFF with a delay of 1000 ms five times.
-
Extra credit: Also, print the letter typed on the Serial Monitor
Brainstorming
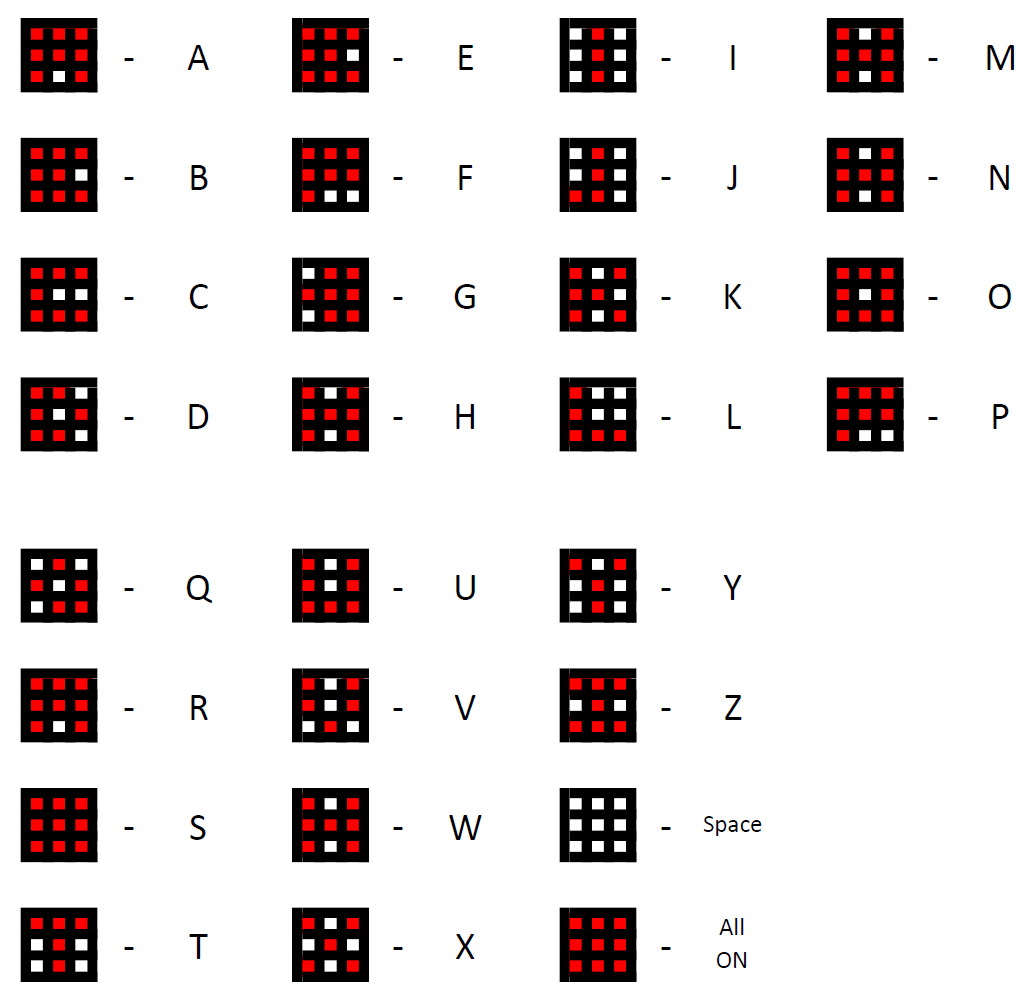
So first of all, we thought, how can we display the letters using 9 LEDs, and came up with the following way.

The next task was to set up the 3×3 LED matrix on the breadboard, which was neither too easy nor too difficult. After breaking a few LEDs, we were able to complete the circuit, with all the ground pins of LEDs common and connected to the GND of Arduino, and the positive pins were connected to the pins (2-10) of the Arduino.
For 1st and 2nd tasks, we have to connect two push buttons, which were connected at 10 and 11 of the Arduino.

Programming
Finally, the programming part.
The idea was to write functions for all the arrangements shown above, then call them one by one to display the letters.
For the 1st task, the letters of "PARITOSH RAJ" were called one by one with a delay of 1000 ms.
For the 2nd task, “All ON” and “Space” were called inside a for loop, which ran 5 times.
For 3rd task, for extra credits, we dig upon the method to take string input from Serial Monitor.
Finally, we got a method on this link, which we modified for our use to
if (Serial.available() > 0) { // is a character available?
    rx_byte = Serial.read(); // get the character

    if (rx_byte != '\n') {
        // a character of the string was received
        rx_str += rx_byte;
    }
    else {
        Serial.println(rx_str);
        rx_str = ""; // clear the string for reuse
    }
} // end: if (Serial.available() > 0)
This would print, whatever you type on the serial monitor.
Then we created a function to take the string, break it into characters and then send it to another function, which would then print the characters irrespective of its case.
void printOn(String rx_str){
    int leng = rx_str.length();
    Serial.println(leng);
    for(int i=0;i<leng;i++){
        printchar(rx_str[i]);
    }
    Serial.println(" ");
}
The fuction printchar(char rx_char) looks something like this:
void printchar(char rx_char){
    Serial.print(rx_char);
    noDisp();
    if((rx_char == 'a')||(rx_char == 'A')){
        A();
    }
    else if((rx_char == 'b')||(rx_char == 'B')){
        B();
    }
    .
    .
    .
    delay(1000);
    noDisp();
}
The final result is something like this:
Problems faced

- Many of the letters look alike, this can only be fixed by using more LEDs and using PCB as shown in the figure.
- While making the circuit, actually it is better to use more than 1 breadboard for making such a complex circuit.
- It should be taken care that, there is already a fuction named F() in Arduino library, so we need to use a different named function for displaying letter F.
- Also, one should not twist the terminals of LED too much as they are very fragile and may break.
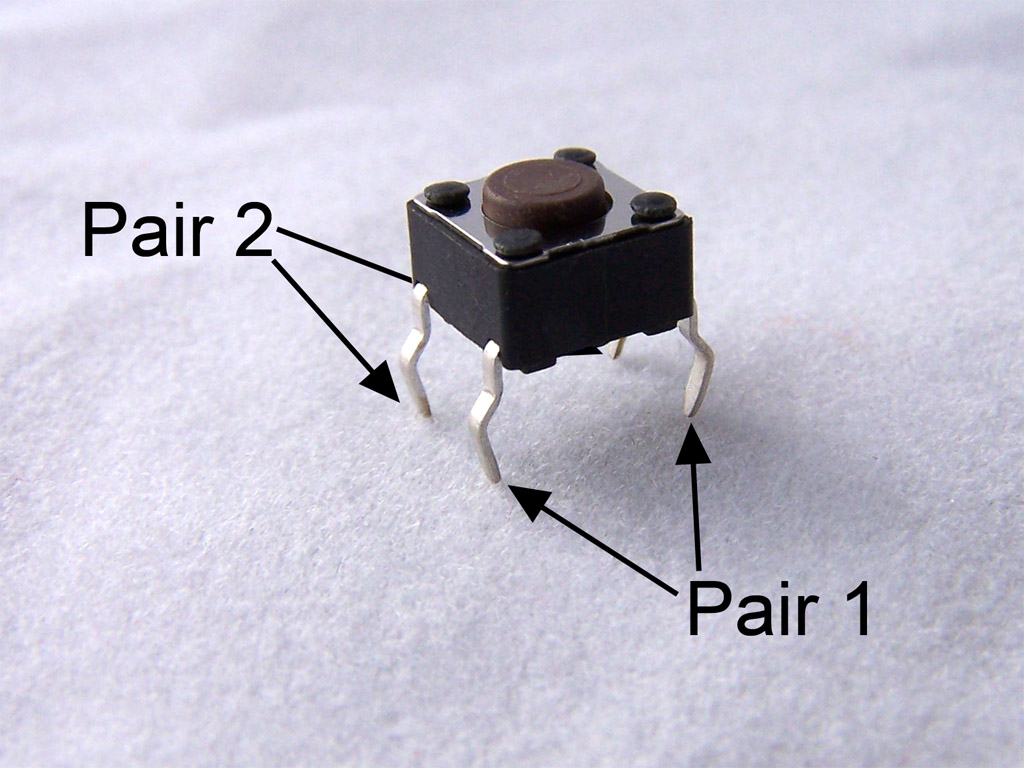
- While using push buttons, one should be careful as which terminals he is using. Actually, the swiching is done between pair 1 and pair 2, so you should select a terminal from pair 1 and one from pair 2.


